In this chapter, We refer to the raw input data with data and not
to data stored in memory of the computer by Storage instances.
With the term preparation we refer to all data processing
steps prior to the reconstruction and avoid the ambiguous term
processing although it may be more familiar to the reader.
Consider the following generic steps which every ptychographer has to complete
prior to a successful image reconstruction.
(A)Conducting a scanning diffraction experiment.
While or after the experiment is performed, the researcher is left with raw images
acquired from the detector and meta data which, in general, consists of scanning
positions along with geometric information about the setup, e.g. photon energy,
propagation distance, detector pixel size etc.
(B)Preparing the data.
In this step, the user performs a subset of the following actions
select the appropriate region of the detector where the scattering events were counted,
apply possible pixel corrections to convert the detector counts of the chosen
diffraction frame into photon counts, e.g. flat-field and dark-field
correction,
switch image orientation to match with the coordinate system of the
reconstruction algorithms,
assign a suited mask to exclude invalid pixel data (hot or dead pixel, overexposure),
and/or simply rebin the data.
Finally the user needs to zip the diffraction frames together with the scanning positions.
(C)Saving the processed data or feed the data into recontruction process.
In this step the user needs to save the data in a suitable format
or provide the data directly for the reconstruction engine.
Data management in PtyPy deals with (B) and (C) as a ptychography
reconstruction software naturally cannot provide actual experimental
data. Nevertheless, the treatment of raw data is usually very similar for
every experiment. Consequently, PtyPy provides an abstract base class,
called PtyScan, which aims to help with steps (B) and (C). In order
to adapt PtyPy for a specific experimental setup, we simply
subclass PtyScan and reimplement only that subset of its methods which are
affected by the specifics of the experiemental setup
(see Tutorial : Subclassing PtyScan).
PtyScan is the abstract base class in PtyPy that manages raw input
data.
A PtyScan instance is constructed from a set of generic parameters,
see scan.data in the ptypy parameter tree.
It provides the following features:
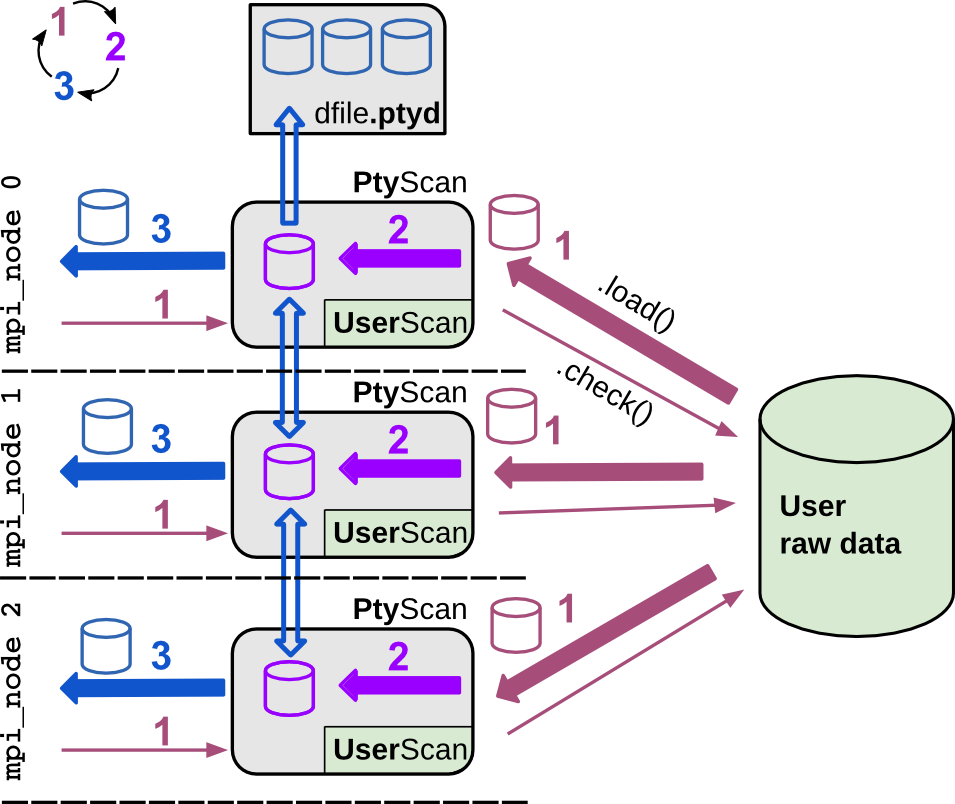
Parallelization
When PtyPy is run across several MPI processes, PtyScan takes care of
distributing the scan-point indices among processes such that each
process only loads the data it will later use in the reconstruction.
Hence, the load on the network is not affected by the number of
processes.
The parallel behavior of PtyScan, is controlled by the parameter
scan.data.load_parallel. It uses the LoadManager
Preparation
PtyScan can handle a few of the raw processing steps mentioned above.
Selection a region-of-interest from the raw detector image. This
selection is controlled by the parameters scan.data.auto_center,
and scan.data.shape and scan.data.center.
Switching of orientation and rebinning are controlled by
scan.data.orientation and scan.data.rebin.
Finding a suitable mask or weight for pixel correction is left
to the user, as this is a setup-specific implementation.
See load_weight(),
load_common(),
load()
and correct()
for detailed explanations.
Packaging
PtyScan packs the prepared data together with the used scan point
indices, scan positions and a weight (=mask) and geometric meta
information. This package is requested by the managing instance
ModelManager on the call
new_data().
Because data acquisition and preparation can happen during a reconstruction
process, it is possible to specify the minimum number of data frames passed
to each process on a new_data() by setting the value of scan.data.min_frames.
The total number of frames processed for a scan is set by scan.data.num_frames.
If not extracted from other files,
the user may set the photon energy with scan.data.energy,
the propagation distance from sample to detector with
scan.data.distance and the detector pixel size with
scan.data.psize.
Storage
PtyScan and its subclass are capable of storing the data in an
hfd5-compatible [HDF] file format. The data file names have a custom
suffix: .ptyd.
A detailed overview of the .ptyd data file tree is given below in
the section Ptyd file format
The parameters
scan.data.save and scan.data.chunk_format
control the way PtyScan saves the processed data.
Note
Although h5py[h5py] supports parallel write, this feature is not
used in ptypy. At the moment, all mpi nodes send their prepared data
to the master node which writes the date to a file.
The PtyScan class of PtyPy provides support for three use cases.
Beamline integreted use.
In this use case, the researcher has integrated PtyPy into the beamline
end-station or experimental setup
with the help of a custom subclass of PtyScan that we call
UserScan. This subclass has its own methods to extract many of the
of the generic parameters of scan.data and also defaults
for specific custom parameters, for instance file paths or file name
patterns (for a detailed introduction on how to subclass PtyScan, see
Tutorial : Subclassing PtyScan). Once the experiment is completed, the researcher can initiate
a reconstruction directly from raw data with a standard reconstruction
script.
A custom subclass UserScan
serves as a translator between PtyPy’s generic parameters and
data types and the raw image data and meta data from the experiment.
Typically the experiment has to be completed before a reconstruction
is started, but with some effort it is even possible to have the reconstruction
start immediately after acquisition of the first frame. As data preparation
is blended in with the reconstruction process, the reconstruction
holds when new data is prepared. Optionally, the prepared data
is saved to a .ptyd file to avoid having to run the preparation steps for subsequent
reconstruction runs.
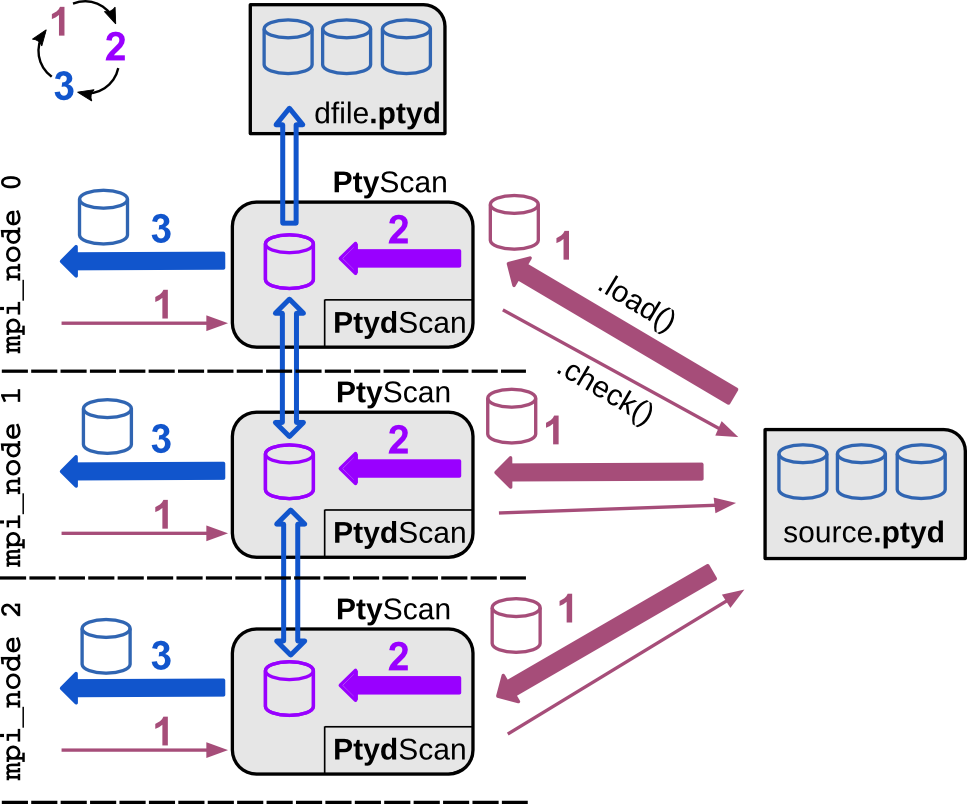
Post preparation use.
In this use case, the experiment is long passed and the researcher has
either used custom subclass of PtyScan or any other script that
generates a compatible .hdf5 file (see here) to save prepared data of that
experiment. Reconstruction is supposed to work when passing the
data file path in the parameter tree.
Only the input file path needs
to be passed either with source or with
dfile when source
takes the value 'file'. In that latter case, secondary processing
and saving to another file is not supported, while it is allowed
in the first case. While the latter case seems infavorable due to the
lack of secondary preparation options,
it is meant as a user-friendly transition switch from the first
reconstruction at the experiment to
post-experiment analysis. Only the source
parameter needs to be altered in script from <..>.data.source=<recipe>
to <..>.data.source='file' while the rest of the parameters are ignored
and may remain untouched.
If a structure-compatible (see Ptyd file format) *.hdf5-file is
available, PtyPy can be used without customizing a subclass of
PtyScan. It will use the shipped subclass PtydScan
to read in the (prepared) raw data.
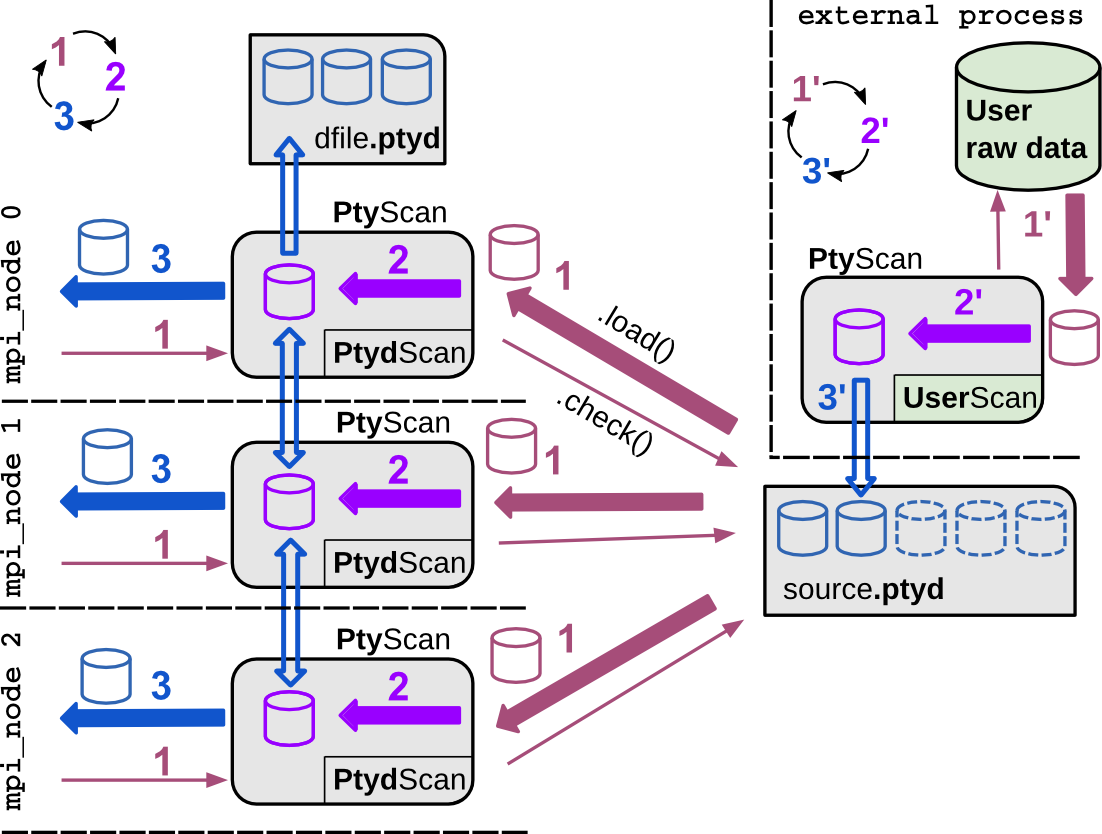
Preparation and reconstruction on-the-fly with data acquisition.
This use case is for even tighter beamline integration
and on-the-fly scans. The researcher has mastered a suitable
subclass UserScan to prepare data from the setup. Now, the preparation
happens in a separate process while image frames are acquired.
This process runs a python script where the subclass UserScan
prepares the data using the auto()
method. The save parameter is set
to ‘link’ in order to create a separate file for each data chunk
and to avoid write access on the source file.
The chunk files are linked back into the main source .ptyd file.
All reconstruction processes may access the prepared data without
overhead or notable pauses in the reconstruction. For PtyPy there
is no difference if compared to a single source file (a feature of [HDF]).
Fig. 22 On-the-fly or demon-like use case of PtyScan.
A separate process prepares the data chunks and saves them
in separate files which are
linked back into the source data file. This process
may run silently as a ‘’demon’’ in the background. Reconstructions
can start immediately and run without delays or pauses due to data
preparation.
Ptypy uses the python module h5py[h5py] to store and load data in the
Hierarchical Data Format [HDF] . HDF resembles very
much a directory/file tree of today’s operating systems, while the “files”
are (multidimensonial) datasets.
Ptypy stores and loads the (processed) experimental data in a file with extension
.ptyd, which is a hdf5-file with a data tree of very simple nature.
Comparable to tagged image file formats like .edf or .tiff, the ptyd data file seperates
meta information (stored in meta/) from the actual data payload
(stored in chunks/). A schematic overview of the data tree is depicted below.
All parameters of meta/ are a subset of scan.data.
Omitting any of these parameters or setting the value of the dataset to
'None' has the same effect.
The first set of parameters
version:strnum_frames:intlabel:str
are general (optional) parameters.
version is ptypy version this dataset was prepared with
(current version is 0.8.1.dev6f61b9d9, see version).
label is a custom user label. Choose a unique label to your liking.
num_frames indicates how many diffraction image frames are
expected in the dataset (see num_frames)
It is important to set this parameter when the data acquisition is not
finished but the reconstruction has already started. If the dataset
is complete, the loading class PtydScan retrieves the
total number of frames from the payload chunks/
which refer to the experimental scanning geometry.
shape
(see scan.data.shape)
energy
(see scan.data.energy or scan.geometry.energy)
distance
(see scan.data.distance)
center : (float,float)
(see scan.data.center)
psize : float or (float,float)
(see scan.data.psize)
propagation : “farfield” or “nearfield”
(see scan.data.propagation)
Finally these parameters will be digested by the
geometry module in order to provide a suited propagator.
Note
As you may have already noted, there are three ways to specify the
geometry of the experiment.
bla
As walking the data tree and extracting the data from the hdf5 file
is a bit cumbersome with h5py, there are a few convenience function in the
ptypy.io.h5rw module.
This tutorial was generated from the python source
[ptypy_root]/tutorial/subclassptyscan.py using ptypy/doc/script2rst.py.
You are encouraged to modify the parameters and rerun the tutorial with:
$ python [ptypy_root]/tutorial/subclassptyscan.py
In this tutorial, we learn how to subclass PtyScan to make
ptypy work with any experimental setup.
The simplest subclass of PtyScan would look like this
>>> classNumpyScan(PtyScan):>>> """>>> A PtyScan subclass to extract data from a numpy array.>>> """>>>>>> def__init__(self,pars=None,**kwargs):>>> # In init we need to call the parent.>>> super(NumpyScan,self).__init__(pars,**kwargs)>>>
Of course this class does nothing special beyond PtyScan.
As it is, the class also cannot be used as a real PtyScan instance
because its defaults are not properly managed. For this, Ptypy provides a
powerful self-documenting tool call a “descriptor” which can be applied
to any new class using a decorator. The tree of all valid ptypy parameters
is located at here. To manage the default
parameters of our subclass and document its existence, we would need to write
>>> fromptypyimportdefaults_tree
>>> @defaults_tree.parse_doc('scandata.numpyscan')>>> classNumpyScan(PtyScan):>>> """>>> A PtyScan subclass to extract data from a numpy array.>>> """>>>>>> def__init__(self,pars=None,**kwargs):>>> # In init we need to call the parent.>>> super(NumpyScan,self).__init__(pars,**kwargs)>>>
The decorator extracts information from the docstring of the subclass and
parent classes about the expected input parameters. Currently the docstring
of NumpyScan does not contain anything special, thus the only parameters
registered are those of the parent class, PtyScan:
>>> print(defaults_tree['scandata.numpyscan'].to_string())[name]default = PtyScanhelp =type = str[dfile]default = Nonehelp = File path where prepared data will be saved in the ``ptyd`` format.type = fileuserlevel = 0[chunk_format]default = .chunk%02dhelp = Appendix to saved files if save == 'link'type = strdoc =userlevel = 2[save]default = Nonehelp = Saving modetype = strdoc = Mode to use to save data to file. <newline> - ``None``: No saving - ``'merge'``: attemts to merge data in single chunk **[not implemented]** - ``'append'``: appends each chunk in master \*.ptyd file - ``'link'``: appends external links in master \*.ptyd file and stores chunks separately <newline> in the path given by the link. Links file paths are relative to master file.userlevel = 1[auto_center]default = Nonehelp = Determine if center in data is calculated automaticallytype = booldoc = - ``False``, no automatic centering - ``None``, only if :py:data:`center` is ``None`` - ``True``, it will be enforceduserlevel = 0[load_parallel]default = datahelp = Determines what will be loaded in paralleltype = strdoc = Choose from ``None``, ``'data'``, ``'common'``, ``'all'``choices = ['data', 'common', 'all'][rebin]default = Nonehelp = Rebinning factortype = intdoc = Rebinning factor for the raw data frames. ``'None'`` or ``1`` both mean *no binning*userlevel = 1lowlim = 1uplim = 32[orientation]default = Nonehelp = Data frame orientationtype = int, tuple, listdoc = Choose <newline> - ``None`` or ``0``: correct orientation - ``1``: invert columns (numpy.flip_lr) - ``2``: invert rows (numpy.flip_ud) - ``3``: invert columns, invert rows - ``4``: transpose (numpy.transpose) - ``4+i``: tranpose + other operations from above <newline> Alternatively, a 3-tuple of booleans may be provided ``(do_transpose, do_flipud, do_fliplr)``choices = [0, 1, 2, 3, 4, 5, 6, 7]userlevel = 1[min_frames]default = 1help = Minimum number of frames loaded by each nodetype = intdoc =userlevel = 2lowlim = 1[positions_theory]default = Nonehelp = Theoretical positions for this scantype = ndarraydoc = If provided, experimental positions from :py:class:`PtyScan` subclass will be ignored. If data preparation is called from Ptycho instance, the calculated positions from the :py:func:`ptypy.core.xy.from_pars` dict will be inserted hereuserlevel = 2[num_frames]default = Nonehelp = Maximum number of frames to be preparedtype = intdoc = If `positions_theory` are provided, num_frames will be ovverriden with the number of positions availableuserlevel = 1[label]default = Nonehelp = The scan labeltype = strdoc = Unique string identifying the scanuserlevel = 1[experimentID]default = Nonehelp = Name of the experimenttype = strdoc = If None, a default value will be provided by the recipe. **unused**userlevel = 2[version]default = 0.1help = TODO: Explain this and decide if it is a user parameter.type = floatdoc =userlevel = 2[shape]default = 256help = Shape of the region of interest cropped from the raw data.type = int, tupledoc = Cropping dimension of the diffraction frame Can be None, (dimx, dimy), or dim. In the latter case shape will be (dim, dim).userlevel = 1[center]default = 'fftshift'help = Center (pixel) of the optical axes in raw datatype = list, tuple, strdoc = If ``None``, this parameter will be set by :py:data:`~.scan.data.auto_center` or elsewhereuserlevel = 1[psize]default = 0.000172help = Detector pixel sizetype = float, tupledoc = Dimensions of the detector pixels (in meters)userlevel = 0lowlim = 0[distance]default = 7.19help = Sample to detector distancetype = floatdoc = In meters.userlevel = 0lowlim = 0[energy]default = 7.2help = Photon energy of the incident radiation in keVtype = floatdoc =userlevel = 0lowlim = 0[add_poisson_noise]default = Falsehelp = Decides whether the scan should have poisson noise or nottype = bool
As you can see, there are already many parameters documented in PtyScan’s
class. For each parameter, most important are the type, default value and
help string. The decorator does more than collect this information: it also
generates from it a class variable called DEFAULT, which stores all defaults:
Now we are ready to add functionality to our subclass.
A first step of initialisation would be to retrieve
the geometric information that we stored in geofilepath and update
the input parameters with it.
That seems to work. We can integrate this parser into
the initialisation as we assume that this small access can be
done by all MPI nodes without data access problems. Hence,
our subclass becomes
>>> @defaults_tree.parse_doc('scandata.numpyscan')>>> classNumpyScan(PtyScan):>>> """>>> A PtyScan subclass to extract data from a numpy array.>>>>>> Defaults:>>>>>> [name]>>> type=str>>> default=numpyscan>>> help=>>>>>> [base_path]>>> type=str>>> default='./'>>> help=Basepathtoextractdatafilesfrom.>>> """>>>>>> def__init__(self,pars=None,**kwargs):>>> p=self.DEFAULT.copy(depth=2)>>> p.update(pars)>>>>>> withopen(p.base_path+'geometry.txt')asf:>>> forlineinf:>>> key,value=line.strip().split()>>> # we only replace Nones or missing keys>>> ifp.get(key)isNone:>>> p[key]=eval(value)>>>>>> super(NumpyScan,self).__init__(p,**kwargs)>>>
We now need a new input parameter called base_path, so we documented it
in the docstring after the section header “Defaults:”.
>>> print(defaults_tree['scandata.numpyscan.base_path'])[base_path]default = './'help = Base path to extract data files from.type = str
As you can see, the first step in __init__ is to build a default
parameter structure to ensure that all input parameters are available.
The next line updates this structure to overwrite the entries specified by
the user.
Good! Next, we need to implement how the class finds out about
the positions in the scan. The method
load_positions() can be used
for this purpose.
>>> print(PtyScan.load_positions.__doc__)

        **Override in subclass for custom implementation**

        *Called in* :py:meth:`initialize`

        Loads all positions for all diffraction patterns in this scan.
        The positions loaded here will be available by all processes
        through the attribute ``self.positions``. If you specify position
        on a per frame basis in :py:meth:`load` , this function has no
        effect.

        If theoretical positions :py:data:`positions_theory` are
        provided in the initial parameter set :py:data:`DEFAULT`,
        specifying positions here has NO effect and will be ignored.

        The purpose of this function is to avoid reloading and parallel
        reads on files that may require intense parsing to retrieve the
        information, e.g. long SPEC log files. If parallel reads or
        log file parsing for each set of frames is not a time critical
        issue of the subclass, reimplementing this function can be ignored
        and it is recommended to only reimplement the :py:meth:`load`
        method.

        If `load_parallel` is set to `all` or common`, this function is
        executed by all nodes, otherwise the master node executes this
        function and broadcasts the results to other nodes.

        Returns
        -------
        positions : ndarray
            A (N,2)-array where *N* is the number of positions.

        Note
        ----
        Be aware that this method sets attribute :py:attr:`num_frames`
        in the following manner.

        * If ``num_frames == None`` : ``num_frames = N``.
        * If ``num_frames < N`` , no effect.
        * If ``num_frames > N`` : ``num_frames = N``.
The parser for the positions file would look like this.
>>> @defaults_tree.parse_doc('scandata.numpyscan')>>> classNumpyScan(PtyScan):>>> """>>> A PtyScan subclass to extract data from a numpy array.>>>>>> Defaults:>>>>>> [name]>>> type=str>>> default=numpyscan>>> help=>>>>>> [base_path]>>> type=str>>> default=/tmp/ptypy/sim/>>> help=Basepathtoextractdatafilesfrom.>>> """>>>>>> def__init__(self,pars=None,**kwargs):>>> p=self.DEFAULT.copy(depth=2)>>> p.update(pars)>>>>>> withopen(p.base_path+'geometry.txt')asf:>>> forlineinf:>>> key,value=line.strip().split()>>> # we only replace Nones or missing keys>>> ifp.get(key)isNone:>>> p[key]=eval(value)>>>>>> super(NumpyScan,self).__init__(p,**kwargs)>>>>>> defload_positions(self):>>> # the base path is now stored in>>> base_path=self.info.base_path>>> pos=[]>>> withopen(base_path+'positions.txt')asf:>>> forlineinf:>>> fname,y,x=line.strip().split()>>> pos.append((eval(y),eval(x)))>>> files.append(fname)>>> returnnp.asarray(pos)>>>
One nice thing about rewriting self.load_positions is that
the maximum number of frames will be set and we do not need to
manually adapt check()
The last step is to overwrite the actual loading of data.
Loading happens (MPI-compatible) in
load()
>>> print(PtyScan.load.__doc__)

        **Override in subclass for custom implementation**

        Loads data according to node specific scanpoint indices that have
        been determined by :py:class:`LoadManager` or otherwise.

        Returns
        -------
        raw, positions, weight : dict
            Dictionaries whose keys are the given scan point `indices`
            and whose values are the respective frame / position according
            to the scan point index. `weight` and `positions` may be empty

        Note
        ----
        This is the *most* important method to change when subclassing
        :py:class:`PtyScan`. Most often it suffices to override the constructor
        and this method to create a subclass suited for a specific
        experiment.
Load seems a bit more complex than self.load_positions for its
return values. However, we can opt-out of providing weights (masks)
and positions, as we have already adapted self.load_positions
and there were no bad pixels in the (linear) detector
The final subclass looks like this. We overwrite two defaults from
PtyScan:
>>> @defaults_tree.parse_doc('scandata.numpyscan')>>> classNumpyScan(PtyScan):>>> """>>> A PtyScan subclass to extract data from a numpy array.>>>>>> Defaults:>>>>>> [name]>>> type=str>>> default=numpyscan>>> help=>>>>>> [base_path]>>> type=str>>> default=/tmp/ptypy/sim/>>> help=Basepathtoextractdatafilesfrom.>>>>>> [auto_center]>>> default=False>>>>>> [dfile]>>> default=/tmp/ptypy/sim/npy.ptyd>>> """>>>>>> def__init__(self,pars=None,**kwargs):>>> p=self.DEFAULT.copy(depth=2)>>> p.update(pars)>>>>>> withopen(p.base_path+'geometry.txt')asf:>>> forlineinf:>>> key,value=line.strip().split()>>> # we only replace Nones or missing keys>>> ifp.get(key)isNone:>>> p[key]=eval(value)>>>>>> super(NumpyScan,self).__init__(p,**kwargs)>>>>>> defload_positions(self):>>> # the base path is now stored in>>> base_path=self.info.base_path>>> pos=[]>>> withopen(base_path+'positions.txt')asf:>>> forlineinf:>>> fname,y,x=line.strip().split()>>> pos.append((eval(y),eval(x)))>>> files.append(fname)>>> returnnp.asarray(pos)>>>>>> defload(self,indices):>>> raw={}>>> bp=self.info.base_path>>> foriiinindices:>>> raw[ii]=np.load(bp+'ccd/diffraction_%04d.npy'%ii)>>> returnraw,{},{}>>>
With the subclass we create a scan only using defaults
>>> NPS=NumpyScan()>>> NPS.initialize()
In order to process the data. We need to call
auto() with the chunk size
as arguments. It returns a data chunk that we can inspect
with ptypy.utils.verbose.report(). The information is
concatenated, but the length of iterables or dicts is always indicated
in parantheses.
Now, your new subclass will be used whenever you pass 'numpy' for
the scan.data.source parameter. All special parameters of the class
should be passed via the dict scan.data.recipe.