Getting started with Ptypy
Installation
General installation instructions
Download and unpack PtyPy from the sources. For example, on Linux systems you can do:
$ wget https://github.com/ptycho/ptypy/archive/master.zip
$ unzip master.zip -d /tmp/; rm master.zip
or make a clone of the PtyPy github repository:
$ git clone https://github.com/ptycho/ptypy.git /tmp/ptypy-master
which will unpack the master branch of ptypy into /tmp/ptypy-master but you are of course free to place the software wherever it is convenient for you. In principle, next you only have to navigate to that directory and install with
$ pip install .
However, since PtyPy depends on a number of other packages, we recommend installing it in a virtual environment using the anaconda package manager. Conveniently, this installation route allows you to install PtyPy across platforms.
Essential install
Only three Python packages are essential for PtyPy to work:
NumPy (homepage: http://www.numpy.org)
SciPy (homepage: http://www.scipy.org)
h5py (homepage: http://www.h5py.org)
Install the essential version like so
$ conda env create -f dependencies_core.yml
$ conda activate ptypy_core
(ptypy_core)$ pip install .
Recommended install for additional functionality
Please note that PtyPy is an alpha release and lacks rigorous import checking. There may be parts of code that implicitly ask for any of the packages listed here. Therefore, we recommend to install these packages.
Matplotlib for any kind of plotting or image generation (homepage: http://www.matplotlib.org)
mpi4py for CPU-node parallelization, contains python bindings for the Message Passaging Interface, (homepage: https://bitbucket.org/mpi4py/mpi4py/)
pyzmq for a threaded server on the main node to perfrom asynchronous client-server communication, contains python bindings for the ZeroMQ protocol, (homepage: http://github.com/zeromq/pyzmq). This package is needed for non-blocking plots of the reconstruction run (e.g. for Run a plotclient in a separate process).
Install the recommended version like so
$ conda env create -f dependencies_full.yml
$ conda activate ptypy_full
(ptypy_full)$ pip install .
Recommended install for GPU support with CuPy
We support an accelerated version of PtyPy for CUDA-capable GPUs based on our own kernels and the CuPy package.
Install the dependencies for this version like so.
$ conda env create -f ptypy/accelerate/cuda_cupy/dependencies.yml
$ conda activate ptypy_cupy
(ptypy_cupy)$ pip install .
Install for GPU support with PyCUDA
Alternatively, we also support an accelerated version of PtyPy for CUDA-capable GPUs based on our own kernels and the PyCUDA package.
Install the dependencies for this version like so.
$ conda env create -f ptypy/accelerate/cuda_pycuda/dependencies.yml
$ conda activate ptypy_pycuda
(ptypy_pycuda)$ pip install .
We use Reikna to provide a filtered FFT, i.e. a FFT that is fused with a pointwise matrix multiplication.
Optional installation of filtered cufft
For optimal performance with both CuPy and PyCUDA engines, you can optionally install a version of the filtered FFT based on cufft and callbacks. Due to the nature of this extension it needs to be built for fixed array sizes externally and currently supports array sizes of 16, 32, 64, 128, 256, 512, 1024 and 2048.
$ conda activate ptypy_cupy
(ptypy_cupy)$ cd cufft
(ptypy_cupy)$ conda env update --file dependencies.yml --name ptypy_cupy
(ptypy_cupy)$ pip install .
Optional packages
Other very useful packages are
Ipython (homepage: http://www.ipython.org)
Quickstart with a minimal script
Note
This tutorial was generated from the python source
[ptypy_root]/tutorial/minimal_script.py using ptypy/doc/script2rst.py.
You are encouraged to modify the parameters and rerun the tutorial with:
$ python [ptypy_root]/tutorial/minimal_script.py
This tutorial explains the minimal settings to get a reconstruction runnig in PtyPy. A PtyPy script consists of two parts:
Creation of a parameter tree with parameters as listed in Parameter tree structure and
calling a
Ptychoinstance with this parameter tree, specifying a level that determines how much the Ptycho instance will do.
Preparing the parameter tree
We begin with opening an empty python file of arbitrary name in an editor of your choice, e.g.:
$ gedit minimal_script.py
Next we create an empty parameter tree. In PtyPy, parameters
are managed by the Param class which is a convenience class subclassing Python’s
dict type. It is designed in such a way that dictionary items can be accessed also as
class attributes, making the scripts and code much more readable.
>>> from ptypy import utils as u
>>> p = u.Param()  # root level
We set the verbosity to a high level, in order to have information on the
reconstruction process printed to the terminal.
See verbose_level.
>>> p.verbose_level = "info"
We limit this reconstruction to single precision. The other choice is to use double precision.
>>> p.data_type = "single"
We give this reconstruction the name 'minimal' although it
will automatically choose one from the file name of the script if we put in
None. (But then the tutorial may not work on your computer as the chosen
run name may differ from the one that this tutorial was created with)
>>> p.run = 'minimal'
Next, we set the home path. The Ptycho instance will use this
path as base for any other relative file path (e.g io.autosave.path
or io.rfile). Relative paths lack a leading “/”
(or “C:\” on windows). Make sure to replace all “/” with “\”
if you run the scripts on a Windows system.
>>> p.io = u.Param()
>>> p.io.home = "/tmp/ptypy/"
We want an intermediate result of the reconstruction to be dumped regularly every 20 reconstructions.
>>> p.io.autosave = u.Param()
>>> p.io.autosave.interval = 20
In this tutorial we switch off the threaded plotting client. (alternative one-liners would be p[‘io.autoplot.active’] = False or p.io[‘autoplot.active’] = False)
>>> p.io.autoplot = u.Param()
>>> p.io.autoplot.active = False
Since we do not want to plot anything, we don’t need the interaction server either.
>>> p.io.interaction = u.Param()
>>> p.io.interaction.active = False
Now we have to insert actual parameters associated with a ptychographic scan.
PtyPy is designed to support reconstruction from mutliple scans.
Each individual scan is represented by a branch in scans. The parameters
in these branches are those that differ from the defaults in the scan
branch mentioned above.
Obviously at least the data branch will differ from
scan.data. In this tutorial we
create a new scan parameter branch MF.
>>> p.scans = u.Param()
>>> p.scans.MF = u.Param()
>>> p.scans.MF.name = 'Vanilla'
>>> p.scans.MF.data = u.Param()
As data source we have choosen the ‘MoonFlowerScan’ test source.
That will make PtyPy use the internal
MoonFlowerScan class to generate data.
This class is meant for testing, and it provides/simulates
diffraction patterns without using the more complex generic
SimScan class.
>>> p.scans.MF.data.name = 'MoonFlowerScan'
We set the diffraction frame shape to a small value (128x128px) and
limit the number af diffraction patterns at 100. The
MoonFlowerScan instance will balance the
diffraction patterns accordingly.
>>> p.scans.MF.data.shape = 128
>>> p.scans.MF.data.num_frames = 100
We skip saving the “prepared” data file for now. The PtyPy data management is described in detail in Data management
>>> p.scans.MF.data.save = None
Needlees to say, we need to specify a reconstruction engine. We choose 40 iterations of difference map algorithm.
>>> p.engines = u.Param()
>>> p.engines.engine00 = u.Param()
>>> p.engines.engine00.name = 'DM'
>>> p.engines.engine00.numiter = 40
>>> p.engines.engine00.numiter_contiguous = 5
Running ptypy
We import the Ptycho class and pass the tree p at level 5.
This level tells Ptycho to initialize everything and start the reconstruction
using all reconstruction engines in p.engines immediately upon construction.
>>> from ptypy.core import Ptycho
>>> P = Ptycho(p, level=5)
From the terminal log, we note that there was an autosave every 20 iterations and the error reduced from iteration to iteration.
Utilies/Binaries for convenience
PtyPy provides a few utility scripts to make life easier for you,
the user. They are located in [ptypy_root]/scripts.
In case of an install with conda, these are copied to <conda_env_dir>/bin
Note
Due to the early stage of developmnet, these scripts may see substantial changes in further releases, i.e. the call signature may change.
Plotting from a reconstruction/dump file (*.ptyr)
ptypy.plot is an automatic plotting script that installs on Unix systems
It has the syntax
$ ptypy.plot [-h] [-l LAYOUT] [-t IMFILE] ptyrfile
For our minimal example this translates to
$ ptypy.plot /tmp/ptypy/recons/minimal/minimal_DM.ptyr -t minimal.png
and the image looks like this (Fig. 1)
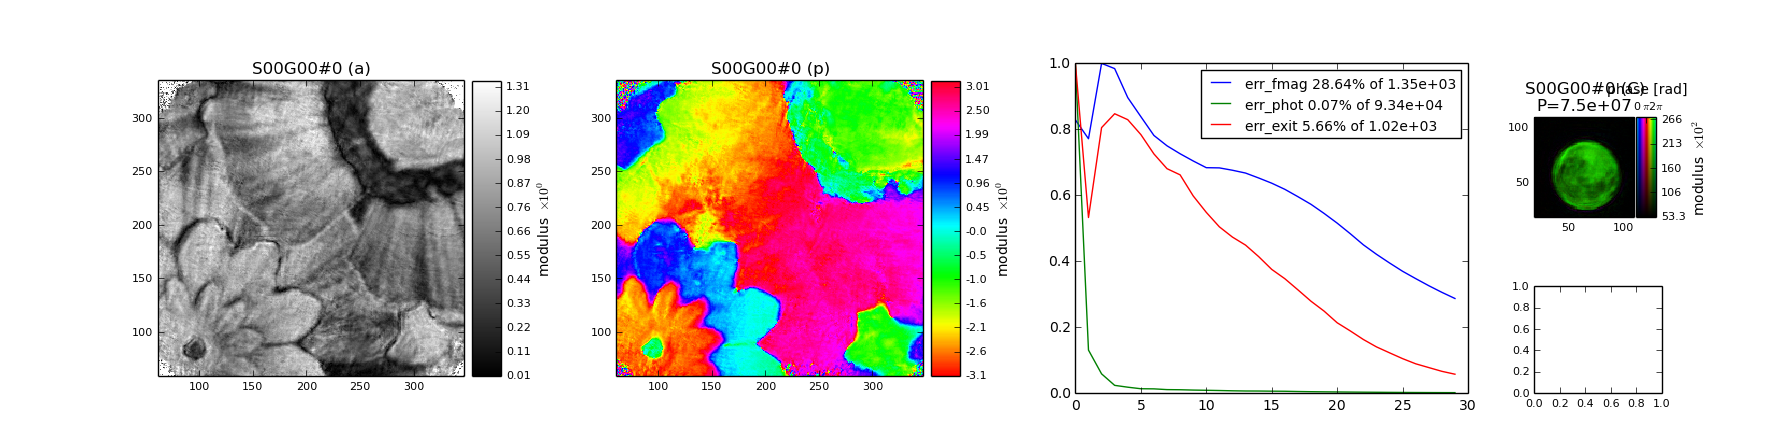
Fig. 1 Example plot made with ptypy.plot using the default layput
Inspecting a hdf5 compatible file
Sometimes we want to quickly inspect what is in a hdf5 file
that was created by PtyPy. For such cases, we can use ptypy.inspect.
$ ptypy.inspect [-h] [-p PATH] [--report] [-d DEPTH] h5file
For example, a quick view at the top level can be realized with
$ ptypy.inspect /tmp/ptypy/recons/minimal/minimal_DM_0040.ptyr -d 1
which has the following the output:
* content [Param 5]:
    * obj [dict 1]:
    * pars [Param 9]:
    * positions [dict 1]:
    * probe [dict 1]:
    * runtime [Param 8]:
* header [dict 2]:
    * description [string = "Ptypy .h5 compatible storage format"]
    * kind [string = "minimal"]
If we are interested solely in the probe we could use
$ ptypy.inspect /tmp/ptypy/recons/minimal/minimal_DM.ptyr -d 1 -p content/probe
which has the following the output:
* SMF [dict 20]:
    * DataTooSmall [scalar = False]
    * ID [string = "SMF"]
    * _center [array = [64. 64.]]
    * _energy [scalar = 7.2]
    * _origin [array = [-3.59918584e-06 -3.59918584e-06]]
    * _pool [dict 0]:
    * _psize [array = [5.62372787e-08 5.62372787e-08]]
    * _record [scalar = (b'SMF',)]
    * _recs [dict 0]:
    * data [1x128x128 complex64 array]
    * distributed [scalar = False]
    * fill_value [scalar = 0.0]
    * grids [tuple = 2x[1x128x128 float64 array]]
    * layermap [list = [0]]
    * model_initialized [scalar = True]
    * nlayers [scalar = 1]
    * numID [scalar = 1]
    * padding [scalar = 0]
    * padonly [scalar = False]
    * shape [tuple = (1, 128, 128)]
We omitted the result for the complete file to save some space but you are encouraged to try:
$ ptypy.inspect /tmp/ptypy/recons/minimal/minimal_DM.ptyr
Create a new template for a reconstruction script
[WIP] Due to wildcards and links in the parameter tree, this section will be reworked.
Run a plotclient in a separate process
PtyPy supports a Client/Server approach. That means that the reconstruction process runs on a remote server (cluster) while we can monitor the progress on a local machine.
In this case, we need to start a plotting Client on a separate machine).
You can implement your own plotting client but you may find it convenient
to use the plotting utility ptypy.plotclient:
$ ptypy.plotclient [-h] [-l LAYOUT] [--dump] [--movie] [-i INTERVAL] [-d DIRECTORY]
Note
None of the options are currently implemented. The plotting client receives all information from the server it connects to. Work in progress ..
More script templates
Besides the script from which section Quickstart with a minimal script was generated, there is a trinity of similar scripts at your disposal that you can temper with.
All-in-one
We encourage you to use the script [ptypy_root]/templates/ptypy_minimal_prep_and_run.py
and modify the recipe part of the data parameter branch.
Observe what changes in the reconstruction when scan parameters change.
 1"""
 2This script is a test for ptychographic reconstruction in the absence
 3of actual data. It uses the test Scan class
 4`ptypy.core.data.MoonFlowerScan` to provide "data".
 5"""
 6from ptypy.core import Ptycho
 7from ptypy import utils as u
 8
 9import tempfile
10tmpdir = tempfile.gettempdir()
11
12p = u.Param()
13
14# for verbose output
15p.verbose_level = "info"
16
17# set home path
18p.io = u.Param()
19p.io.home = "/".join([tmpdir, "ptypy"])
20
21# saving intermediate results
22p.io.autosave = u.Param(active=False)
23
24# opens plotting GUI if interaction set to active)
25p.io.autoplot = u.Param(active=True)
26p.io.interaction = u.Param(active=True)
27
28# max 200 frames (128x128px) of diffraction data
29p.scans = u.Param()
30p.scans.MF = u.Param()
31# now you have to specify which ScanModel to use with scans.XX.name,
32# just as you have to give 'name' for engines and PtyScan subclasses.
33p.scans.MF.name = 'BlockVanilla' # or 'BlockFull'
34p.scans.MF.data= u.Param()
35p.scans.MF.data.name = 'MoonFlowerScan'
36p.scans.MF.data.shape = 128
37p.scans.MF.data.num_frames = 200
38p.scans.MF.data.save = None
39
40# position distance in fraction of illumination frame
41p.scans.MF.data.density = 0.2
42# total number of photon in empty beam
43p.scans.MF.data.photons = 1e8
44# Gaussian FWHM of possible detector blurring
45p.scans.MF.data.psf = 0.
46
47# attach a reconstrucion engine
48p.engines = u.Param()
49p.engines.engine00 = u.Param()
50p.engines.engine00.name = 'DM'
51p.engines.engine00.numiter = 80
52
53# prepare and run
54if __name__ == "__main__":
55    P = Ptycho(p,level=5)
Creating a .ptyd data-file
We encourage you to use this script [ptypy_root]/templates/ptypy_make_sample_ptyd.py
to create various different samples and see what happens if the data
processing parameters are changed. If you have become curious, move
forward to Data management and take a look at PtyPy’s data management.
Check out the data parameter branch scan.data for detailed parameter
descriptions.
 1"""
 2This script creates a sample *.ptyd data file using the built-in
 3test Scan `ptypy.core.data.MoonFlowerScan`
 4"""
 5import time
 6from ptypy import utils as u
 7from ptypy.core.data import MoonFlowerScan
 8# for verbose output
 9u.verbose.set_level("info")
10
11# create data parameter branch
12data = u.Param()
13data.dfile = 'sample.ptyd'
14data.num_frames = 200
15data.save = 'append'
16data.label = None
17data.auto_center = None
18data.rebin = None
19data.orientation = None
20
21# create PtyScan instance
22MF = MoonFlowerScan(data)
23
24MF.initialize()
25for i in range(2):
26    # autoprocess data
27    msg = MF.auto(200)
28    time.sleep(2)
29    # logs the out put of .auto() to terminal prompt
30    u.verbose.logger.info(u.verbose.report(msg), extra={'allprocesses': True})
Loading a data file to run a reconstruction
The script [ptypy_root]/templates/minimal_load_and_run.py
should resembles the case of data analysis after the experiment has taken
place. Take a challenging sample data from before
and alter the reconstruction parameters and algorithms to find out if you
can make the recontruction converge. Check out the engine parameter
branch engine for detailed parameter descriptions.
 1"""
 2This script is a test for ptychographic reconstruction after an
 3experiment has been carried out and the data is available in ptypy's
 4data file format in the current directory as "sample.ptyd". Use together
 5with `ptypy_make_sample_ptyd.py`.
 6"""
 7from ptypy.core import Ptycho
 8from ptypy import utils as u
 9
10import tempfile
11tmpdir = tempfile.gettempdir()
12
13p = u.Param()
14p.verbose_level = "info"
15p.io = u.Param()
16p.io.home = "/".join([tmpdir, "ptypy"])
17
18p.scans = u.Param()
19p.scans.MF = u.Param()
20p.scans.MF.data= u.Param()
21p.scans.MF.name = 'BlockVanilla'
22p.scans.MF.data.name = 'PtydScan'
23p.scans.MF.data.source = 'file'
24p.scans.MF.data.dfile = 'sample.ptyd'
25
26p.engines = u.Param()
27p.engines.engine00 = u.Param()
28p.engines.engine00.name = 'DM'
29p.engines.engine00.numiter = 80
30p.engines.engine01 = u.Param()
31p.engines.engine01.name = 'ML'
32p.engines.engine01.numiter = 20
33
34if __name__ == "__main__":
35    P = Ptycho(p,level=5)